Jakho

Jakho

Full Stack developer.
x

The bumpy journey of using the Tesla V100 graphics card on an old motherboard

Background#

Due to the low performance of computers used in general development scenarios for front-end development, I previously spent less than 1k on a set of I5-6600 + Mini ITX motherboard in a small case that has been my main development machine. After upgrading to 32G of memory, even the integrated graphics driver is more than sufficient for daily development tasks. Additionally, I have a MacBook available for iOS development tasks. Recently, AI has been a hot topic, and coincidentally, some of the company's projects involve using Stable Diffusion for small painting applications. After trying it out, I found it quite interesting. Since the company's development environment has shared computing power, I thought about whether I could upgrade the graphics card using old hardware to reach the threshold for playing with AI.

Component Selection#

AI painting requires a large amount of video memory to store models and training data, so the larger the video memory capacity, the better the AI painting effect. Therefore, video memory capacity is a very important factor in my selection process. I found many posts online stating that at least 8GB of video memory is needed to handle AI painting tasks, but to create higher resolution images without running out of memory, it is recommended to choose 16GB or higher.

Searching on the second-hand market, many older computing cards such as P102, P104, P106, P40, M40, and P100 have a very high cost-performance ratio, with 8G or even 16G of video memory available for less than a thousand yuan or even two to three hundred yuan. I initially planned to choose the P100 as the graphics card for this upgrade. However, considering that the Pascal architecture is indeed a bit old, I saw that the V100 chip is the next generation of the P100, with stronger performance and not too high a price difference, so I decided to go for the V100 SXM2 16GB server version computing card (the reason for choosing SXM2 will be mentioned later).

Build Configuration#

Here is the configuration for this build:

Motherboard: Gigabyte GA-B250M-DS3H
CPU: Intel Core I5-6600
Graphics Card: NVIDIA V100 SXM2 16G
Memory: 2 x 16G 2666MHz from Guangwei
Hard Drive: Seagate FireCuda 520 1TB SSD

The motherboard was purchased to accommodate the old 6th generation I5 and needed to support a large graphics card. Considering the size, I chose an M-ATX motherboard, which can be found for just over a hundred. The old machine was compact and used DC power, so it wasn't worth much when sold, so I found a G4400T low-power chip on the second-hand market for over 20 yuan to install Debian as a NAS device. I chose the cheaper memory since the old motherboard wouldn't support frequencies over 2400. The hard drive was taken from the old machine, and I bought a 1TB drive for 299 yuan before prices skyrocketed; now I regret not buying a couple more.

The highlight of the graphics card choice is the Tesla V100, specifically the SXM2 version, which requires a PCIe adapter card to be used on a consumer PC motherboard. The price of the adapter card is roughly equal to that of the graphics card, around 1300+, and I didn't choose the PCIe version because it was similarly priced but more expensive. However, if the graphics card becomes outdated in the future, I can still use the adapter card and replace it with other SXM2 specification graphics cards, which are generally cheaper than PCIe versions.

Why Not Choose Modified Graphics Cards#

It is well known that the modified version of the 2080TI 22G is more cost-effective for rendering and drawing, and the Turing architecture is more advanced. However, considering that the memory chips have been replaced, the stability has received many negative reviews online. After comprehensive consideration, I still chose the server-specific computing card.

Modifying BIOS to Support Above 4G#

After assembling the components mentioned above, I powered on the machine, but to my surprise, it couldn't boot and went directly into the BIOS interface, displaying a long string of English messages indicating that it detected insufficient PCI resources and could not drive the PCI devices.

image

At this point, I hurriedly searched online for related cases to see if there were any solutions. I found one: in the motherboard BIOS, there is a switch called Above 4G, which needs to be enabled to resolve the issue. If your motherboard BIOS can enable Resizable BAR, that would be even better, as it will enhance performance.

Additionally, it is important to note that enabling Above 4G means that the system boot mode must be changed to UEFI, and the CSM option in the motherboard BIOS needs to be set to disabled. You can find many tutorials online on how to reinstall the system via UEFI; they are plentiful and straightforward, so I won't elaborate further.

In summary, three options need to be set:

  1. Enable Above 4G
  2. Enable Resizable BAR (if available)
  3. Disable the CSM compatibility for system boot

The key point is that I didn't expect my Gigabyte B250M motherboard to lack this option. After searching for many cases of the same motherboard online, there were no solutions, so I had to modify the hidden options in the BIOS.

Using AMIBCP to Enable Hidden Options on the Motherboard#

First, remove the graphics card from the motherboard, as you cannot enter the system otherwise.

Once successfully booted into the system, download the latest BIOS file for the motherboard from the official website to use as a modification template.

Download the AMIBCP software, open the original BIOS file you just downloaded, and note that the software defaults to limiting the format; you need to select the option for all file types to find it.

image

image

Then, as shown in the image, find the Above 4G option, change Access/Use to User, and set the last two items to Enabled.

image

image

After making the changes, save or save as a new BIOS file, and remember to distinguish it from the original BIOS to avoid confusion when trying to revert to the original BIOS later.

Using AFUWINGUI to Flash the BIOS#

Taking the Gigabyte motherboard as an example, if the modified BIOS file cannot be updated using the official method, it must be flashed using a third-party method. There are many ways to do this, such as using a programmer, but I chose the most convenient method, which is to flash it directly in Windows.

First, download and open AFUWINGUI.

image

Click the open button and select the modified BIOS file from above.

Then, click the refresh button on the right, wait for the refresh status to complete, and when it shows Done, the modified BIOS has been successfully flashed.

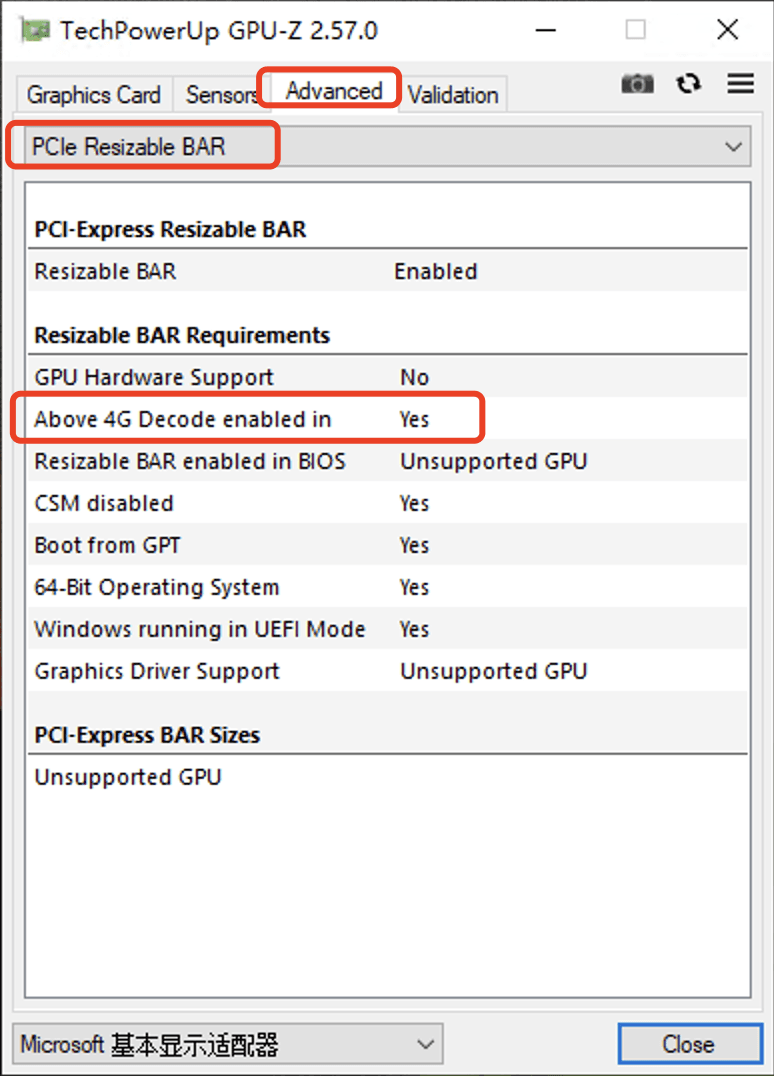
You can use GPU-Z software to check the options as shown below, and you will see that Above 4G has been enabled.

image

At this point, you can shut down, install the graphics card, and restart.

Postscript#

As the title suggests, the journey has not been simple. After installing the graphics card, it was recognized normally, and after installing the NVIDIA driver, everything regarding memory frequency was also normal.

What puzzled me was that after rebooting, executing nvidia-smi in the command line surprisingly indicated no devices. When I opened the device manager, I saw that the graphics card had a yellow triangle icon. I rebooted several times, but it was still ineffective, and it seemed like a failure. Then I uninstalled the driver, rebooted, and reinstalled it, and to my surprise, it was successfully recognized again. However, after another reboot, the yellow triangle icon reappeared.

Could there be some missing settings? I was completely baffled and spent several days without finding the cause, and there were no related cases online.

Until one day, while looking back at the photos I took of the graphics card, I noticed that a capacitor had fallen off the upper right corner of the graphics card. I immediately contacted the seller for a replacement, suspecting that this might be the issue.

image


After a long wait for the replacement, I was surprised to find that the new graphics card had the same issue. After rebooting Windows 10, I needed to uninstall the driver again and reinstall it for the graphics card to function properly. I suspect it might be due to the motherboard being too old or some issue with the system drivers. However, since I rarely shut down my machine, I made do with it. I plan to try installing Windows 11 or look for other solutions when I have time.


Later, I found that I only needed to enter the NVIDIA driver management and disable ECC detection after successfully installing the driver once. I tested it, and after rebooting, the driver would no longer drop.


A few days later, this method became ineffective. I continued to search for solutions and eventually found a compromise: by running a script to uninstall the graphics card before shutting down, the graphics card could be detected and driven normally upon booting. The reason is that the motherboard is a consumer-grade platform rather than a server platform, resulting in fewer PCIe lanes. When the lanes are tight, it can easily lead to insufficient resources for the graphics card. The solution is to uninstall the graphics card before shutting down, allowing the system to skip the detection of this graphics card during boot. When the computer detects the graphics card upon startup, it can drive it normally. We can create a one-click script to solve this:

Create a directory Scripts on the C drive, create a .txt file, and save the following content (make sure to choose ANSI encoding format when saving), naming it Uninstall-NVIDIA.ps1:

$deviceName = "NVIDIA Tesla V100-SXM2-16GB"
$device = Get-PnpDevice | Where-Object { $_.FriendlyName -eq $deviceName }
if ($device) {
  pnputil.exe /remove-device $device.InstanceId
}

In the current directory, create another .txt file, save the following content, and name it Uninstall-GPU.bat:

@echo off
powershell.exe -ExecutionPolicy Bypass -File "C:\Scripts\Uninstall-NVIDIA.ps1"

Now, before each shutdown, just click this uninstall script Uninstall-GPU.bat, and after rebooting or shutting down, the graphics card will be recognized normally. This is currently the best solution. If you don't want to do this, you would need to switch to a motherboard with more PCIe lanes, such as X99 or X299.

Loading...
Ownership of this post data is guaranteed by blockchain and smart contracts to the creator alone.