老主板使用 Tesla V100 显卡的坎坷历程
2024年3月25日
背景
因为前端开发应对现在一般的开发场景下用到的电脑性能不高,所以我之前花了不到 1k 在闲鱼捡了一套 I5-6600 + Mini ITX 主板的小机箱一直承担着我的主力开发使用,上 32G 内存之后即使核显驱动应对平时日常开发也是绰绰有余,而且在面对 iOS 端开发任务的时候我也有 MacBook 可以使用。这段时间风口上的 AI 实在是火热,凑巧公司一些业务中有用到 Stable Diffusion 做一些绘画小应用,尝试之后感觉挺有意思,因为公司开发环境算力是公用的,所以想着能不能尽量使用旧硬件的情况升级一下显卡达到可玩 AI 的门槛。
配件选型
AI 绘画需要大量的显存来存储模型和训练数据,因此显存容量越大,AI 绘画的效果就越好,所以显存容量是我非常重要选型考虑的因素。看了网上很多帖子,一般至少需要 8GB 的显存才能够胜任 AI 绘画的任务,但为了能绘制更高分辨率的图片并且不爆显寸,建议还是选择 16GB 或者更高的显存容量。
打开闲鱼一搜索,很多老的计算卡诸如 P102、P104、P106、 P40、M40、P100 之类的计算卡性价比都非常高,不足千元甚至两三百元就能摸到 8G 显存甚至 16G 显存的门槛,本身打算是选择 P100 作为本次升级使用的显卡。但是考虑到帕斯卡架构确实是老了一些,又看到 V100 芯片作为 P100 的下一代,性能更强,差价也不算太高,就咬咬牙选择了 V100 SXM2 16GB 服务器版本的计算卡(后面会提到选择 SXM2 的原因)。
装机配置
以下是本次装机的配置:
主板:技嘉 GA-B250M-DS3H CPU:Intel 酷睿 I5-6600 显卡:NVIDIA V100 SXM2 16G 内存:光威悍将 16G 2666MHz 两条 硬盘:希捷酷玩 520 1TB SSD
主板方面是照顾着旧主机用着的 6 代 I5 来购买的,而且需要上大显卡,综合考虑尺寸选择了 M-ATX 主板,多多上一百多就能有交易。旧的主机因为小巧又是 DC 供电,出了也不值钱,所以在闲鱼 20 多淘了一块 G4400T 低功耗芯片用来安装 Debian 做 NAS 设备。内存挑便宜的买,毕竟旧主板,支持的频率不会超过 2400。硬盘是从旧机器上拆下的,赶在硬盘涨价之前在东子家国际 299 入的 1T,看着价格疯涨,现在后悔没买多两根。
显卡方面是重头戏选择是了 Tesla V100,而且是 SXM2 版本的,需要搭配 PCIE 转接卡才能用在家用 PC 主板上,转接卡价格基本和显卡持平,都是在 1300+ 左右,不直接买 PCIE 版本的考虑是因为价格上差不多但是偏贵,但如果显卡以后过时了,我转接卡还能继续使用,还可以替换其他 SXM2 规格的显卡,这类型的显卡一般情况下都会比 PCIE 版本便宜。
为什么不选择魔改显卡
众所周知,目前魔改版的 2080TI 22G 做炼丹和绘图更具性价比,图灵架构也更先进,但毕竟考虑到是替换了显存颗粒,稳定性看了很多网上的评价都不太好,综合考虑之下还是选择了服务器专用的计算卡。
修改 BIOS 让主板支持 Above 4G
在上面的配件组装完成之后,开机,没想到机都开不成,直接进到了 BIOS 界面,并且提示一大串英文,意思就是检测到你的 PCI 资源不足啦,无法驱动你的 PCI 设备。

这时候,我当然是急忙地去网上搜索相关的案例,看看有没有解决方案。一搜,还真的有,就是在主板 BIOS 里找到一个叫 Above 4G 的开关,把它设置为启动,就可以解决了。如果你的主板 BIOS 能开启 Resizable BAR 的话更好,也一并开启,性能会更强一些。
另外。还需要注意的是,开启了 Above 4G 后意味着系统引导方式也得改为 UEFI 了,并且主板 BIOS 里的 CSM 选项需要设置为 disabled 关闭,可以在网上寻找如何通过 UEFI 来重装系统的教程,有很多,也很简单,就不再赘述了。
总而言之,就是需要设置三个选项。
- 打开 Above 4G
- 打开 Resizable BAR (如有)
- 关闭系统引导的 CSM 兼容
重点来了,没想到我的这个技嘉 B250M 主板竟然没有这个选项,找了网上很多相同主板的案例也是没有解决方案,那么就只能修改 BIOS 隐藏选项了。
使用 AMIBCP 开启主板隐藏选项
首先,将显卡从主板上卸下,不然无法进入系统。
成功开机进入系统后,需要在主板的官网下载到主板的最新 BIOS 文件作为魔改蓝本。
下载 AMIBCP 软件,打开刚才下载的原版 BIOS 文件,注意软件默认限定了格式,这里选择全部类型文件选项才能找到。


然后按照图示,找到 Above 4G 选项,把 Access/Use 改为 User,并且后两项默认改为 Enabled 开启。


更改完成后保存或另存为新的 BIOS 文件,记得将它和原版 BIOS 区分开,以免日后想刷回原版 BIOS 后找不到或者找错文件。
使用 AFUWINGUI 刷入 BIOS
以技嘉主板为例,如果经过修改后的 BIOS 文件是无法使用官网的更新方法进行主板 BIOS 更新的,必须通过第三方的刷入方式,方式有很多,比如使用编程器之类的,但我选择最方便的方法,就是直接在 Windows 下刷入。
首先,下载并打开 AFUWINGUI

点击开启按钮,选择刚才上面修改好的 BIOS 文件,
然后,点击右侧刷新按钮,等待刷新状态完成,显示为 Done 后,修改好的 BIOS 就刷入完成了。
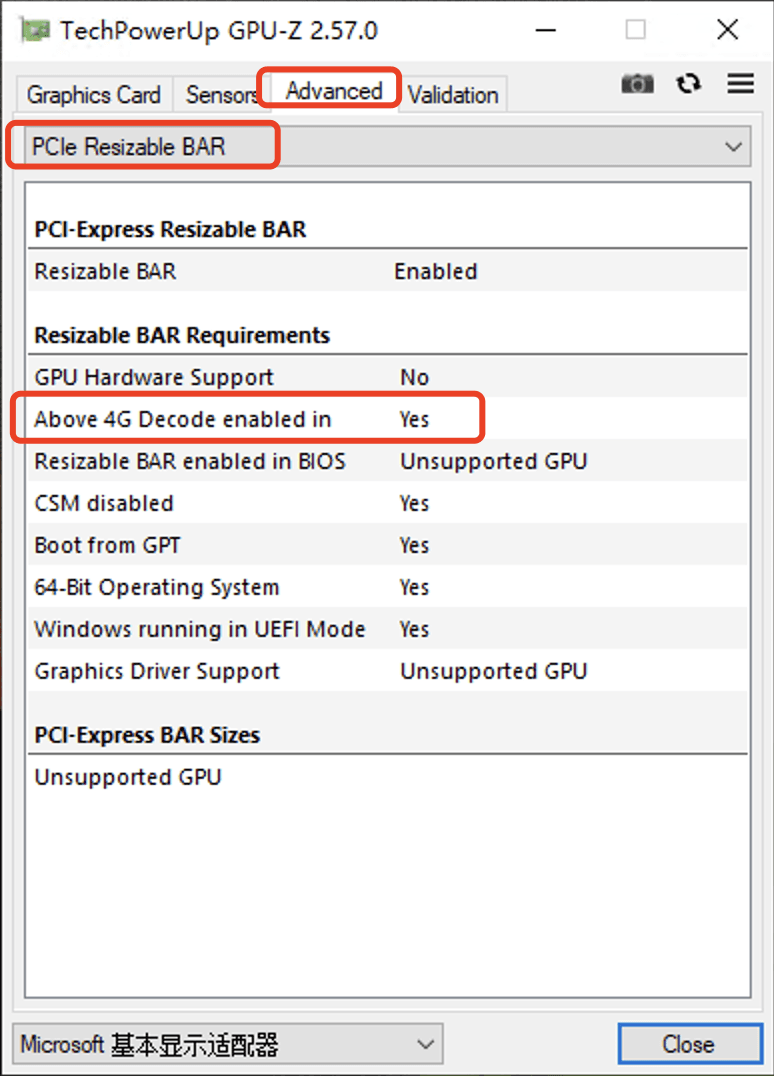
可以通过 GPU-Z 软件,可以按照如下图的选项进入,可以看到 Above 4G 已经开启。
这时候,就可以关机把显卡装上,就能重新启动了。
后记
标题说到坎坷历程,那当然是没那么简单了,装上显卡后开机能够正常识别了,装上英伟达的驱动后,显存频率什么的也一切正常。
让我感到离奇的是,重启后,在命令行执行 nvidia-smi 竟然提示没有设备。打开设备管理器上一看,显卡是竟然被打上了三角叹号。重启了几遍,依旧是于事无补,看样子像是翻车了,然后我把驱动卸载掉,重启再装上,没想到装上后马上又成功驱动识别了。再重启,又显示三角感叹号。
难道是有什么遗漏的设置吗?让我十分摸不着头脑,折腾了好几天也没找到原因,网上也没有相关的案例。
直到有一天,看回当时拍的显卡照片,发现原来显卡右上角掉了一颗电感,马上联系卖家换新,我估计原因可能是出在这里了。

经过漫长的等待换货之后,新显卡插上之后没想到也是一样,WIN10 重启后需要重新卸载驱动再打驱动才能正常使用显卡,估计还是主板太老了或者系统驱动哪一块没对,但是毕竟我本身比较少关机,也就将就用了,回头有空试试安装 WIN11 或者找别的办法研究一下。
后面发现,只需要在装成功驱动的那一次,进入英伟达驱动管理,将 ECC 检测关闭,亲测重启后就不会再掉驱动了。
过了几天,这个方法就失效了,后面继续寻找解决方案,最终找到一个折中的解决办法,就是在关机前运行脚本卸载显卡,在开机时,这个显卡就能正常检测到并且正常驱动了,原因是主板是消费级平台,而不是服务器平台,PCIE 通道数比较少,一旦通道数吃紧就容易会导致显卡运行资源不足的情况,解决这个办法就是关机前卸载显卡,让他开机时跳过这个显卡的检测,等开机时电脑检测到这个显卡,重新驱动,就能正常识别了。我们可以通过创建一个一键脚本来解决:
在 C 盘创建一个目录Scripts,创建一个.txt文件,保存以下内容(保存时注意选择为:ANSI 编码格式),另存为Uninstall-NVIDIA.ps1:
$deviceName = "NVIDIA Tesla V100-SXM2-16GB"
$device = Get-PnpDevice | Where-Object { $_.FriendlyName -eq $deviceName }
if ($device) {
  pnputil.exe /remove-device $device.InstanceId
}
在当前目录再创建一个.txt文件,保存以下内容,另存为Uninstall-GPU.bat:
@echo off
powershell.exe -ExecutionPolicy Bypass -File "C:\Scripts\Uninstall-NVIDIA.ps1"
这样,在每次关机前,先点击一下这个卸载脚本Uninstall-GPU.bat,重启或者关机后就能正常识别显卡了,目前这个已经是最优的解决办法了,如果不想这样,只能换一些 PCIE 通道数更多的主板如 X99 或者 X299 了。